Categories
IV Instructor Certification

Teaching IV Therapy Using Erikson’s Theory of Development

By Nancy Kimmel MSN, FNP, RN, PhD CHMM, MSN-FNP-BC

Intravenous (IV) therapy is a core clinical skill for student nurses, nurses, anesthesia techs, veterinary techs, and dentists who administer fluids, draw blood, or deliver medications. Teaching IV therapy effectively requires integrating clinical accuracy, sterile technique, patient-centered communication, and developmental psychology. Erikson’s psychosocial stages provide a robust framework for tailoring instruction and patient education across the lifespan. This comprehensive article synthesizes clinical lecture content, safety fundamentals, pharmacologic and fluid principles, geriatric considerations (including guidance from the National Center for Aging and Development and the National Institute on Aging), and pedagogical strategies for instructors who prepare learners for safe, competent practice.

Clinical Foundations of IV Therapy: Indications, Authorization, and Safety

IV therapy is used for a range of clinical purposes: blood collection, chemotherapy, immunosuppressants, vitamin therapy, fluid resuscitation, emergency drugs, and procedural sedation. Always obtain physician or authorized prescriber authorization prior to initiating IV therapy. Because intravenously administered substances enter the systemic circulation almost immediately, any error—wrong fluid, wrong concentration, incorrect rate—can rapidly produce systemic complications: infection, tissue necrosis, air embolism, extravasation injury, and hemodynamic instability.

Sterile Technique and Skin Preparation

Sterility is non-negotiable. Use aseptic technique for catheter insertion and dressing changes. Cleanse the insertion site with chlorhexidine and follow the manufacturer’s and institutional instructions for contact time (commonly a 30-second to 1-minute scrub depending on product and policy). When using chlorhexidine, allow the area to dry completely before puncture; do not blot. Avoid contamination by using sterile gloves, maintaining a sterile field for catheter handling, and using transparent dressings that allow visualization of the insertion site.

Authorization, Indications, and Documentation

IV therapy must be ordered by an authorized provider. Indications should be documented and verified prior to cannulation. Charting is legal protection and professional responsibility: document the time of insertion, gauge and type of catheter, location (vein name and side), patient response to the procedure, flush volume and solution, and any complications or patient instructions. Accurate charting protects the patient and the clinician; it is a required part of scope-of-practice standards for nurses and is equally relevant for monitoring by anesthesia techs, veterinary techs (in clinical applications), and dentists when IV access is used in sedation.

Anatomy, Vein Selection, and Insertion Technique

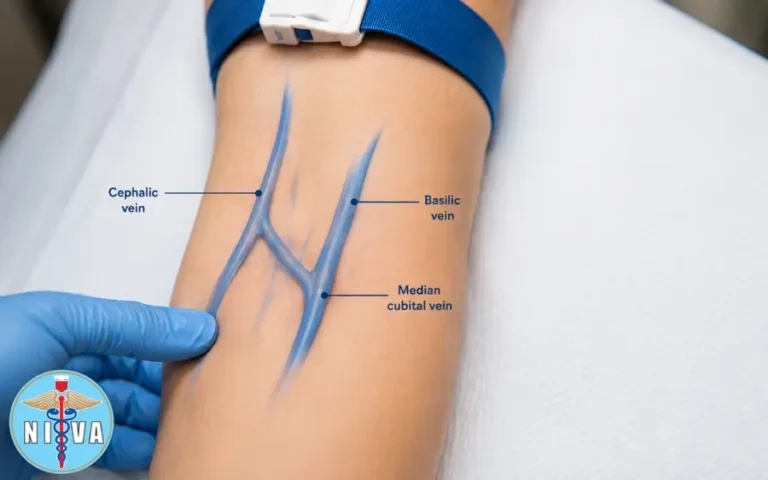
Knowledge of venous anatomy, skin and subcutaneous layers, and vessel structure is essential to safe catheter insertion. Vein selection combines knowledge, palpation, visualization, and patient factors. Common peripheral access sites include the antecubital fossa veins—the cephalic, basilic, and median cubital veins—because these are large and easy to cannulate. Trace a chosen vein for at least an inch to ensure a straight path for the catheter and reduce the risk of infiltration or dislodgement. Avoid hands and lower extremities unless clinically necessary; hands are more mobile and prone to dislodgement, and legs should be avoided especially in diabetic patients due to poorer circulation and higher infection risk.

Layers Traversed During Peripheral IV Insertion
Layer Key Points
Epidermis Outermost skin; provides barrier—clean and prepare.
Dermis Contains small blood vessels and nerve endings; careful technique reduces pain and hematoma.
Hypodermis (Subcutaneous tissue) Loose connective tissue; needle passes through before vessel puncture.
Venous tunica (intima/media/externa) Target is venous lumen; correct angle and bevel orientation important to avoid through-and-through puncture.

Insertion Angle and Technique

  • Hold the catheter at a 15–28 degree angle with the bevel up. Lower the angle as you approach the vein to advance the catheter smoothly into the lumen.
  • Watch for flashback (blood in the catheter chamber), which indicates successful entry into the vein.
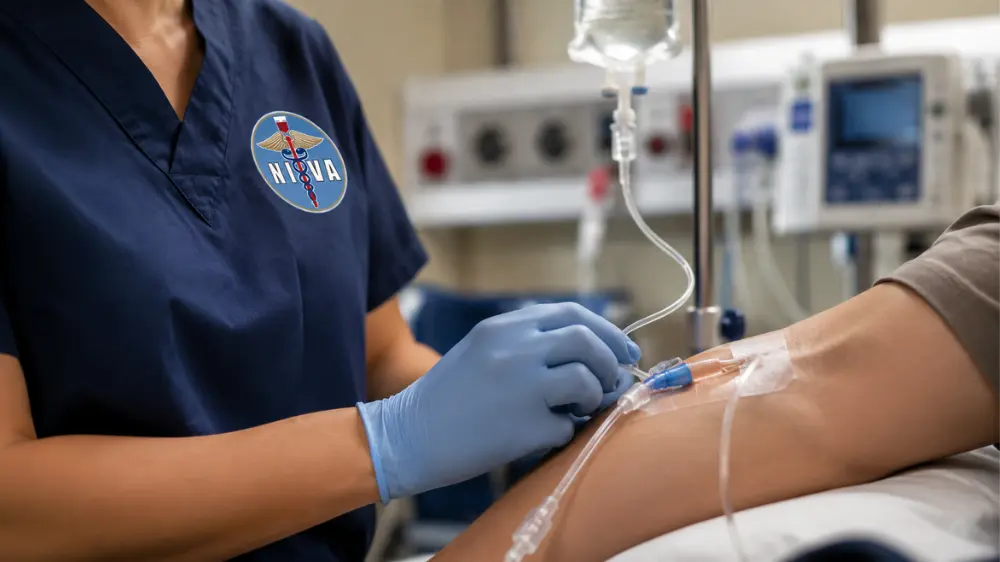
  • Once flashback is achieved, advance the catheter slightly, then thread the catheter over the needle (or follow device-specific technique) and withdraw the needle while advancing the catheter into the vein.
  • Do not push too hard. Excessive force can result in passing through the vein (a through-and-through), perforation, or creating a false passage. If resistance is met during advancement, stop and reassess—the catheter may be against a valve or not aligned with the lumen.
  • Resistance on flush and inability to aspirate blood are signs that the catheter is not intravascular; do not infuse—remove and recannulate as needed.

IV Catheters, Gauges, and Clinical Uses

Choose catheter gauge based on indication: blood transfusions require larger bore; concurrent medications or CT contrast demand larger lumens; fragile veins may necessitate smaller gauges. Below is a practical guide.

Peripheral IV Catheter Gauge Guide
Gauge Typical Use
14–16G Trauma resuscitation, rapid transfusion, major surgery.
18G CT contrast, blood transfusion, major fluid resuscitation.
20G General adult use, medications, fluids.
22G Smaller adults, children, fragile veins.
24–26G Infants, neonates, very small veins.

Fluid Types, Osmolarity, and Hemodynamic Considerations

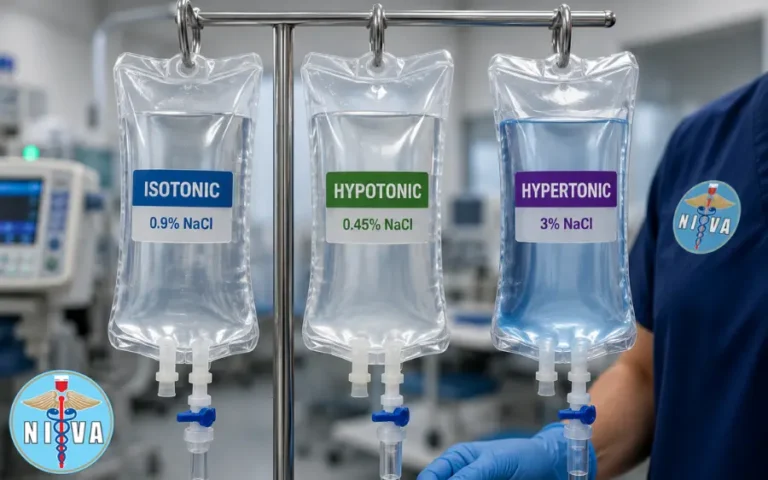
Understanding fluid physiochemistry is essential for safe IV therapy. Fluids are classified by tonicity relative to plasma (normal plasma pH 7.35–7.45).

  • Isotonic solutions (e.g., 0.9% NaCl, or “normal saline”) approximate extracellular fluid osmolarity and do not cause net fluid shift between compartments. Normal saline is commonly used for volume resuscitation and as a carrier for medications. Note: while often described as matching body pH, normal saline has a slightly different chloride concentration than plasma and can contribute to hyperchloremic metabolic acidosis if given in large volumes; monitor clinical context.
  • Hypertonic solutions (e.g., 3% saline, hypertonic dextrose solutions) draw water from the intracellular and interstitial compartments into the vascular system. They are used to treat cerebral edema and severe hyponatremia under strict monitoring. These fluids can precipitate or worsen volume overload and are high risk in heart failure (CHF) patients.
  • Hypotonic solutions (e.g., 0.45% NaCl) push water into cells and tissues and are used for intracellular dehydration (hypernatremia correction cautiously). They can worsen edema and are contraindicated in patients at risk for increased intracranial pressure.

Rapid infusion, particularly in fragile patients, may precipitate cardiovascular overload manifested by increased heart rate, hypertensive changes, shortness of breath, and hypoxemia—events that can escalate to code blue. Always consider patient comorbidities and hemodynamic status when choosing fluid type and infusion rate.

Drip Rates, Pumps, and Fragile Patients

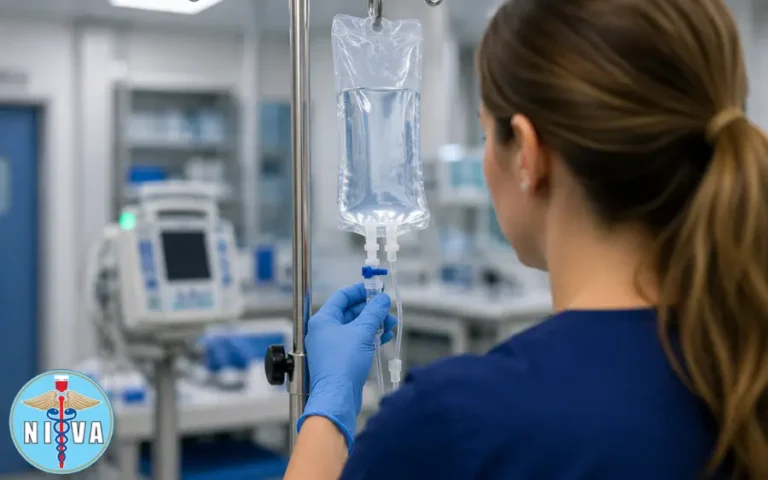
Drip rates must be calculated accurately. Electronic infusion pumps reduce human error for continuous or high-risk infusions. For student nurses and anesthesia techs, mastery of pump programming is an essential competency. A rapid infusion (e.g., bolus of several liters in a short period) in an older adult or a patient with heart failure can cause acute pulmonary edema. Monitor vitals, lung sounds, oxygenation, and patient-reported dyspnea closely during and after bolus therapy.

Medication Administration, Label Reading, and Sampling Considerations

Medications given intravenously bypass absorption barriers; label reading and comprehension are lifesaving habits. Always read medication labels carefully—distinguish saline flush syringes from syringes that contain drugs (atropine, lidocaine, insulin, potassium, etc.). Never assume a syringe contains saline without reading the label. Use barcode scanning and double-check protocols per institutional policy.

When IVs are used for medication administration, timing matters for subsequent blood draws. Some medications will contaminate samples and alter laboratory results. Wait appropriate times according to medication pharmacokinetics and institutional policy before drawing blood from the same line, or better, draw blood from a different site or via dedicated lab draw lines when available. Follow your organization’s protocol regarding the required flush volume and dwell time prior to sampling or using the line for other infusions.

Do not apply a tourniquet to an arm with an established IV line—this can occlude flow, cause backpressure, promote edema, disrupt catheter position, and pose infection risk. If blood draw is needed on the same limb, consult policy—alternate site or proximal tourniquet placement may be required—and coordinate with the team.

Complications: Recognition and Immediate Actions

Recognize common IV complications and act quickly:

  • Phlebitis: pain, erythema, palpable cord along vein. Discontinue IV, apply warm compresses, and document.
  • Infiltration/extravasation: swelling, coolness, blanching at site; extravasation of cytotoxic agents (chemotherapy, some immunosuppressants) can cause tissue necrosis—stop infusion, aspirate residual drug if possible, notify provider, follow extravasation protocol (antidotes, local measures).
  • Infection: purulence, fever, local redness—remove catheter and send tip for culture per policy if catheter-related bloodstream infection suspected. Early identification reduces sepsis risk.
  • Air embolism: sudden dyspnea, chest pain, hypotension—place patient in left lateral decubitus and Trendelenburg, call for help, administer oxygen, and follow institutional emergency protocol.
  • Rapid infusion/volume overload: tachycardia, hypertension, dyspnea, low oxygen saturation—stop infusion, administer oxygen, elevate head of bed, notify provider, prepare diuretics if ordered, and monitor vitals closely.
  • Bleeding and hematoma: apply firm pressure, elevate limb, and monitor coagulation status if relevant.

Professional Responsibilities, Scope, and Documentation

Charting is both a clinical and legal obligation: document insertion time, catheter gauge and type, insertion site and vein name (e.g., right cephalic at antecubital fossa), patient tolerance, flush volume and solution (e.g., 10 mL normal saline), dressing type, and next planned reassessment or removal time. Record any complications, interventions, and communication with prescribers.

Scope of practice differs by role and jurisdiction. Medical assistants (MAs), phlebotomists, and other allied health personnel must consult supervisors when care falls outside their approved scope. When in doubt, ask for help. Admit when you lack knowledge or skill—this protects the patient and supports a culture of safety. Student nurses and novice clinicians should always work under appropriate supervision until demonstrated competence is documented.

Teaching IV Therapy: Instructor Concepts—Preparation, Passion, Patience

For instructors teaching student nurses, nurses, anesthesia techs, veterinary techs, and dentists, effective pedagogy blends content expertise, structured practice, and relational skill. The instructor’s role includes three P’s: preparation, passion, and patience.

  • Preparation: Plan sessions with clear objectives, competency checklists, simulation scenarios, and assessment tools. Prepare equipment, manikins, ultrasound devices, and sterile supplies. Provide pre-reading (anatomy, fluid types, policies) and structured feedback forms.
  • Passion: Demonstrate clinical excellence and modeling behaviors—sterile technique, precise documentation, compassionate communication. Enthusiasm is contagious and motivates learners to strive for competency.
  • Patience: Psychomotor skills take time. Provide deliberate practice opportunities with stepwise coaching, positive reinforcement, and low-risk simulation before live patient practice.

Manage classroom dynamics: set ground rules for safety, create small practice groups, rotate learners through stations (ultrasound-guided practice, landmark-based skills, troubleshooting), and ensure each learner receives formative feedback. Use objective structured clinical examinations (OSCEs) and skill checklists to standardize competency assessments.

Continuous Learning and Instructor Development

IV therapy practice evolves: new catheter technologies, antimicrobial dressings, practice guidelines, and evidence on fluid therapy require lifelong learning. Encourage instructors and learners alike to consult authoritative sources—CDC guidance on infection prevention, the National Institutes of Health (NIH) literature, and the National Library of Medicine (NLM) resources—to stay current. Maintain institutional partnerships and enroll in continuing education through professional associations.

Useful external resources include:

Assessment, Competency, and Skill Retention

Assessment should be multi-modal: direct observation with checklist, simulation-based assessment, written knowledge tests, and reflective debriefing. Competency criteria include:

  • Demonstrating aseptic technique consistently.
  • Selecting appropriate catheter gauge and site based on clinical indications.
  • Accurate calculation and programming of infusion rates.
  • Recognizing and managing complications in a timely manner.
  • Documenting thoroughly and clearly.

Use spaced repetition and periodic reassessment to support retention for student nurses, nurses, anesthesia techs, veterinary techs, and dentists who may perform IV access infrequently.

Applying Erikson’s Psychosocial Stages to Teaching IV Therapy

Erik Erikson’s eight stages of psychosocial development provide a powerful framework for tailoring education and communication strategies for both patients and learners. Each stage suggests specific psychosocial needs and learning approaches. Below, I map each stage to practical teaching strategies for instructors and bedside clinicians.

1. Infancy (Trust vs. Mistrust)

Age focus: infants to ~18 months. For IV therapy in infants and neonates, trust-building is paramount. Parents and caregivers are the central figures; secure attachment affects cooperation and stress responses. For student nurses and novice clinicians working with neonates:

  • Minimize separation; allow parents to be present and participate in soothing techniques during IV insertion.
  • Use gentle voice, swaddling, sucrose solution for pain reduction (per institutional policy), and rapid, skilled technique to reduce distress.
  • Instructor guidance: model quick, efficient insertions and soft handling; allow learners to practice on simulation models before live patients.

2. Early Childhood (Autonomy vs. Shame and Doubt)

Age focus: ~1–3 years. Autonomy and control are developing. Young children benefit from developmentally appropriate choices and reassurance.

  • Offer simple choices (which arm, which sticker) to foster cooperation and autonomy.
  • Explain each step briefly and honestly; use distraction techniques and involve the child when possible.
  • Instructor emphasis: teach learners to use age-appropriate language and incorporate caregivers in the process.

3. Preschool (Initiative vs. Guilt)

Age focus: ~3–5 years. Children begin to take initiative but may feel guilty about causing trouble. Positive reinforcement and praise after IV procedures support coping.

  • Provide simple explanations, allow the child to “help” (touching the bandage), and offer praise.
  • Teach student nurses to prepare distraction tools and a reward system to reinforce brave behavior.

4. School Age (Industry vs. Inferiority)

Age focus: ~6–11 years. Competence and mastery are central. Explain the procedure in more detail and emphasize the child’s ability to cooperate.

  • Provide clear steps and allow the child to ask questions; be honest about sensations.
  • Allow for small decisions that foster a sense of mastery (e.g., choosing arm position).

5. Adolescence (Identity vs. Role Confusion)

Age focus: ~12–18 years. Adolescents value autonomy, privacy, and clear rationale. Communication should be respectful and collaborative.

  • Provide full explanations of risks, benefits, and alternatives. Involve them in decisions about IV therapy when appropriate.
  • Address body image concerns (e.g., visible tubing) discreetly, and respect preference for same-sex provider when feasible.

6. Young Adulthood (Intimacy vs. Isolation)

Age focus: ~19–40 years. Adults at this stage value relationships and collaborative decision-making. For student nurses and anesthesia techs:

  • Include family or partners in education if the patient desires. Use shared decision-making for treatment choices involving IV therapy (e.g., outpatient antibiotic therapy vs. inpatient).
  • Teach learners to assess support systems and plan for discharge teaching accordingly.

7. Middle Adulthood (Generativity vs. Stagnation)

Age focus: ~40–65 years. This stage emphasizes productivity and responsibility. Adults benefit from clear instructions on long-term IV therapy management (e.g., home infusions).

  • Provide comprehensive training on home infusion pumps, dressing changes, and signs of complications.
  • Encourage problem-solving and empower patients to take an active role in maintenance and troubleshooting.

8. Maturity (Integrity vs. Despair)

Age focus: ~65+ years (geriatrics). Older adults prioritize meaning and dignity. Teaching must be sensitive to sensory deficits, comorbidities, and cognitive changes. Integrate guidance from the National Center for Aging and Development (NCAD) and the National Institute on Aging (NIA) for geriatric best practices.

  • Use larger-font handouts, speak clearly and slowly, and allow extra time for questions. Confirm understanding with teach-back methods.
  • Consider vascular fragility—choosing smaller gauge catheters, avoiding legs in diabetics, and protecting skin with padding. Monitor for dehydration, electrolyte imbalance, and volume overload more vigilantly.
  • Involve family or caregivers in education and documentation for home care.

Helpful geriatric resources:

  • National Institute on Aging (NIA)
  • Consult National Center for Aging and Development (NCAD) training materials and local geriatrics consultation services for tailored approaches.

Adapting Teaching Strategies to Employee and Learner Roles

The way we teach IV therapy differs by learner role and future application. Below are practical considerations for various learners:

Student Nurses

  • Curriculum: integrate anatomy, pharmacology, and evidence-based infection prevention into hands-on labs.
  • Practice: structured skills labs, simulation scenarios, and supervised bedside practice with graded autonomy.
  • Assessment: OSCEs and supervised clinical evaluations documenting time, gauge, location, and patient response in chart entries.

Nurses

  • Focus on advanced assessment (e.g., recognizing subtle early signs of volume overload), pump management, and complex infusion therapies (chemotherapy protocols, immunosuppressants).
  • Ongoing competency maintenance and charting standards should be reinforced.

Anesthesia Techs

  • Emphasize swift, sterile access for perioperative management and the ability to troubleshoot large-bore access needs for resuscitation.
  • Simulation of emergent scenarios where rapid fluid administration and medication delivery are necessary.

Veterinary Techs

  • Adapt principles to animal anatomy and behavior—sedation may be required for placement. Maintain aseptic technique and know species-specific vascular sites. Veterinary techs should collaborate with veterinarians regarding fluid types and medications appropriate for different species.
  • Document fluid type, rate, and animal response in medical records.

Dentists

  • When IV access is used in dental sedation or anesthesia, dentists and dental teams must adhere to sterile technique, correct drug administration, and monitoring standards. Training should include IV insertion basics, recognition of complications, and emergency management for airway or cardiovascular events.

Practical Classroom and Clinical Exercises

Create progressive learning activities:

  1. Skill Stations: anatomy review, sterile setup, catheter selection, insertion practice on task trainers, and ultrasound-guided access practice.
  2. Simulated Scenarios: medication error, extravasation of a vesicant, rapid infusion causing pulmonary edema—practice crisis resource management and teamwork.
  3. Documentation Drills: charting exercises that require precise documentation of time, gauge, location, and response.
  4. Ethics and Scope: case discussions where learners determine whether to proceed, call a supervisor, or refuse based on scope of practice.

Resources, Certifications, and Further Training

For learners seeking focused phlebotomy and IV therapy instruction, established training organizations and institutes provide structured coursework and certification pathways. Examples include the PCT Institute of Healthcare and Phlebotomy Career Training, which offer foundational and advanced coursework for phlebotomists and allied health technicians. These programs complement institutional training requirements and serve as a resource for student nurses, nurses, and allied personnel to achieve procedural proficiency.

Additional external references for evidence-based practice and infection prevention include the CDC, the NIH, and the NLM. Certification bodies such as the NAPTP and continuing education through the NTA support ongoing competence and professional development.

Special Considerations: Diabetics, Hands, and Lower Extremities

Avoiding certain sites is an important safety principle: hands and legs are last-resort sites in many adult patients due to mobility and increased risk of infection or thrombosis. Diabetic patients frequently have peripheral vascular disease and neuropathy—leg veins are more prone to poor healing and infection. Always choose the most proximal site feasible that maintains patient safety and function and preserves future access sites for ongoing therapies.

Putting It All Together: An Instructor’s Checklist

Use this practical checklist when preparing a learner for IV insertion and infusion management:

  • Confirm prescriber order and indication for IV therapy.
  • Review patient history for allergies, bleeding risk, vascular access limitations, and comorbidities (e.g., CHF, renal failure, diabetes).
  • Gather supplies and set up sterile field; verify chlorhexidine for skin prep and allow appropriate contact/dry time.
  • Select vein by palpation and visualization; trace vein for at least one inch for straightness.
  • Choose appropriate catheter gauge; consider patient size and therapy.
  • Use 15–28 degree insertion angle, bevel up; watch for flashback, do not advance forcefully.
  • Flush gently; resistance indicates malposition—do not infuse.
  • Secure catheter, apply transparent dressing, and label with date/time/gauge.
  • Document time, gauge, location, flush volume and solution, patient response, and plan for reassessment/removal.
  • Provide patient education using Erikson-informed communication (age-appropriate explanations, teach-back).

Integrating Psychosocial Care and Technical Mastery

Teaching IV therapy is more than a procedural checklist—it is a synthesis of technical skill, safety vigilance, and psychosocial competence. Using Erikson’s stages enables instructors to craft communications and practices that respect developmental needs. For student nurses and practicing clinicians—including nurses, anesthesia techs, veterinary techs, and dentists—competence includes sterile technique, accurate fluid and medication management, complication recognition, and respectful, stage-appropriate communication with patients and families.

Always reinforce the professional responsibilities: read labels carefully to distinguish saline from medications such as atropine or lidocaine; follow institutional policy for waiting intervals after medication administration before drawing blood; never apply a tourniquet to an arm with an IV line; and document thoroughly to provide legal protection and continuity of care. When in doubt about any aspect of IV therapy practice, consult your supervisor or a more experienced clinician—admitting the limits of your knowledge is a fundamental patient safety behavior.

Appendix: Quick Reference Tables

Signs of IV Complications and Immediate Actions
Complication Signs Immediate Action
Phlebitis Redness, warmth, pain, palpable cord Stop infusion, remove IV, apply warm compress, document, notify provider
Infiltration/Extravasation Swelling, cool skin, pain, blanching Stop infusion, aspirate drug if possible, elevate limb, follow extravasation protocol
Infection Fever, purulent drainage, increasing local erythema Remove catheter per protocol, send cultures, start antibiotics per order
Air Embolism Sudden dyspnea, chest pain, hypotension Position left lateral decubitus, administer O2, call emergency response
Volume Overload Dyspnea, tachycardia, crackles, low O2 sat Stop infusion, elevate HOB, administer O2, notify provider

References and Selected Readings

For evidence-based practice review, clinicians and instructors should consult the following authorities:

  • CDC Guidelines for the Prevention of Intravascular Catheter-Related Infections: cdc.gov
  • National Institute on Aging: materials for communicating with older adults and geriatric care considerations: nia.nih.gov
  • NIH and NLM resources for pharmacology and fluid therapy updates: nih.gov, nlm.nih.gov
  • Training programs such as PCT Institute of Healthcare and Phlebotomy Career Training for structured curricular supplements.
  • Professional associations and certification organizations: NAPTP, NTA.

Ready to Earn Your National IV Certification?

The National IV Association (NIVA) offers nationally recognized certification programs for nurses, EMTs, paramedics, and other licensed healthcare professionals. Train online, test when ready, and earn credentials that employers trust.

For foundational training in healthcare careers, visit the PCT Institute of Healthcare or explore certification options at Phlebotomy Career Training.

Enroll Now →

Frequently Asked Questions

How can Erikson’s theory support IV therapy education?

Erikson’s psychosocial stages give instructors a framework for adapting communication, reassurance, participation, and teaching methods to a learner’s or patient’s developmental needs.

Does one teaching approach work for every age group?

No. Effective education should account for developmental stage, communication preferences, cognitive needs, privacy, caregiver involvement, and the individual’s clinical circumstances.

What should IV therapy instructors emphasize?

Instructors should combine preparation, patient-centered communication, supervised practice, objective assessment, clear documentation, and adherence to current organizational policies and professional scope.

How should learners apply the clinical information in this article?

The material is educational. Learners should follow current laws, professional scope-of-practice requirements, manufacturer instructions, employer policies, and appropriate clinical supervision.
Categories
Uncategorized

Difficult IV Access: Strategies and Techniques for Challenging Patients

Difficult IV Access: Strategies and Techniques for Challenging Patients

By Nancy Kimmel, MSN, FNP, RN, PhD CHMM, MSN-FNP-BC — National IV Association

Introduction: Why difficult IV access (DIVA) matters to patient safety and clinical practice

Difficult intravenous access (DIVA) is one of the most frequent procedural challenges across inpatient, outpatient, perioperative, emergency, and community settings. Student nurses, nurses, anesthesia techs, veterinary techs, and dentists all encounter patients with challenging vascular access—each with unique procedural and safety implications. Intravenous therapy is a powerful clinical intervention used for blood collection, administration of chemotherapy, immunosuppressants, vitamin therapy, and a wide range of medications and fluids. Because fluids and medications administered intravenously enter the circulation rapidly, any error—whether poor technique, wrong fluid selection, or misplacement—can lead to systemic consequences including infection, tissue necrosis, or rare but catastrophic events such as air embolism and cardiovascular overload. For this reason, IV therapy requires physician authorization and must adhere to strict sterile technique, careful vein selection, and accurate documentation.

Scope and audience

This extended clinical review is written for a broad clinical audience including student nurses, nurses, anesthesia techs, veterinary techs, and dentists who may perform peripheral IV placement, assist with IV medication administration, or be responsible for monitoring venous access. Wherever local regulation or scope-of-practice limits apply, healthcare assistants and medical assistants should consult supervising clinicians or their institutional policies before performing IV tasks.

Foundational physiology and safety considerations

Understanding why IV therapy is powerful — and potentially dangerous — begins with basic physiology. The intravenous route bypasses natural barriers and delivers solutions directly to the bloodstream, which means:

  • Rapid systemic distribution of drugs and fluids (onset in seconds to minutes),
  • Small errors in concentration, rate, or placement can cause systemic toxicity or local tissue injury,
  • Inserted devices provide a direct path for microbes into the vascular system unless sterile technique is rigorously applied.

Always remember: IV therapy must be authorized by a licensed provider, and practitioners must adhere to facility protocols and their professional scope of practice.

Anatomy review and vein selection strategy

Selecting an appropriate vein is the single most important step in successful IV insertion. The ideal peripheral vein is straight, adequately sized for the catheter, palpable, mobile (i.e., not tethered to tendons), and distal to any areas of injury, infection, or previous infiltration. Key anatomic sites include the antecubital fossa (cephalic, basilic, median cubital veins), forearm veins, and dorsal hand veins.

Veins commonly used for peripheral IV access

Vein Anatomic location Pros Cons
Cephalic Radial/lateral side of antecubital fossa and forearm Often large and straight; accessible for pumps May be superficial and move with arm position
Basilic Ulna/medial side of arm Often large, good for ultrasound-guided access Close to nerves, and more movement at elbow; may be uncomfortable
Median cubital Across antecubital fossa Usually prominent and stable for blood draws Not ideal for ambulatory patients due to elbow flexion
Dorsal hand veins Back of hand Easy to visualize and safe for short-term use Prone to infiltration and more painful; avoid if possible in fragile skin

Clinical pearls:

  • Trace the vein for at least an inch (2.5 cm) proximally to ensure continuity and a straight segment for catheter placement.
  • Avoid the hands and lower extremities unless there is no reasonable alternative—especially in patients with diabetes, peripheral vascular disease, or lymphedema, where leg access increases the risk of infection and vascular complications.
  • When selecting a site, consider future therapies: avoid antecubital sites if a central line or dialysis access will be needed in the same limb, and avoid sites with PICC lines or prior axillary node dissection or mastectomy (lymphedema risk).

Layers traversed during IV insertion

An appreciation of the skin and vascular layers improves technique. A peripheral insertion traverses:

  • Epidermis — the outermost layer, provides barrier function;
  • Dermis — contains sensory nerve fibers and small vessels;
  • Hypodermis (subcutaneous tissue) — the fatty layer containing deeper capillaries and loose connective tissue;
  • Venous tunica — the vessel wall (intima, media, adventitia), into which the catheter must be positioned without perforation.

Preparing for insertion: sterile technique and safety checks

Aseptic technique is non-negotiable for minimizing catheter-related bloodstream infections (CRBSIs). Elements of best practice include:

  • Hand hygiene immediately prior to the procedure;
  • Use of appropriate personal protective equipment (gloves, and mask/gown as indicated by local policy);
  • Skin antisepsis with chlorhexidine gluconate (CHG) in alcohol — scrub and allow to dry for at least one minute (1 min) per evidence-based recommendations;
  • Use of sterile dressings and securement devices after placement;
  • Confirming physician authorization for IV therapy and following facility IV orders (solution, rate, medication compatibility).

Always read medication and solution labels carefully. Mistaking normal saline (0.9% NaCl) for another solution (e.g., atropine, lidocaine) can be catastrophic. Saline 0.9% is isotonic and approximates body plasma osmolarity and pH (physiologic pH range approximately 7.35–7.45). Hypertonic solutions draw water into the vascular compartment (useful in specific clinical contexts like cerebral edema but dangerous in heart failure), while hypotonic solutions push fluid into cells and tissues (useful for dehydration but risky for cellular swelling). When drawing blood from an IV line after giving medications, be aware of timing recommendations to avoid contamination of the sample and misinterpretation of results.

Insertion technique: practical, step-by-step guidance

Basic insertion technique remains a core competency for nurses, student nurses, and supportive techs. Key steps and technical tips follow:

  • Position the patient with the selected limb supported and accessible. Explain the procedure and obtain consent when required. Use patient-centered language appropriate to the individual’s developmental stage (see Erikson integration later).
  • Apply a tourniquet proximally to distend veins for visualization and palpation. Note: do not apply tourniquets to a limb that already has an indwelling IV line in place. Do not place tourniquets on limbs with prior lymph node dissections or other contraindications.
  • Palpate and trace the vein for at least an inch to ensure a straight run. Consider warming the limb (warm compress or hand-warming techniques) for 3–5 minutes to improve vein dilation, especially in DIVA patients.
  • Prepare the skin with chlorhexidine; allow at least one minute drying time.
  • Stabilize the vein distal to the insertion site with the non-dominant hand. Stretch the skin slightly to anchor the vein and reduce its mobility.
  • Insert the catheter with the bevel up at an angle of approximately 15–28 degrees. This angle allows entry into the lumen while minimizing the risk of transfixing the posterior vessel wall.
  • Watch for the flashback of blood in the catheter hub or chamber. Once the flashback is visualized, advance the catheter a millimeter or two and then lower the angle to advance the catheter fully into the vessel without puncturing through the opposite wall.
  • If excessive resistance is encountered when flushing (resistance on flush), remove and reassess — you are likely not within the lumen, or the catheter tip may be against the vessel wall.
  • Secure the catheter with sterile dressing, label the site with date/time/gauge, and document the procedure: time, gauge, location, patient response, number of attempts, and any complications observed.

Bevel orientation, angle, and flashback

Bevel up reduces the force required to penetrate the vessel wall and improves tactile feedback. The target entry angle range 15–28 degrees is recommended to balance easy penetration with minimal risk of posterior wall puncture. Watch for flashback—this confirms intraluminal entry. If you see no flashback or the flashback is sluggish, do not forceable advance the catheter. Instead, withdraw slightly, readjust angle, and attempt again. For fragile veins (e.g., elderly skin), consider using a smaller gauge catheter and ultrasound guidance to reduce trauma.

Choosing catheter size and device type

Catheter gauge selection is clinically important—choose the smallest gauge that will accommodate therapy needs to reduce vein trauma and thrombosis risk. A quick reference:

Gauge Common uses Implications
14–16G Major trauma, rapid fluid resuscitation, blood transfusion Large bore; causes significant vessel trauma; reserved for emergencies
18G Blood products, standard IV fluids in stable adults Good balance of flow and vessel preservation
20G Most adult peripheral infusions and routine meds Standard for many adult patients
22–24G Pediatrics, elderly, fragile veins, slow infusions Smaller lumen, slower flow; gentler on veins

When peripheral access is impossible or when therapy requires prolonged venous access or vesicant agents (e.g., many chemotherapy agents), consider escalation to midline catheters, peripherally inserted central catheters (PICC), or tunneled central venous catheters in coordination with the ordering provider and vascular access team.

Advanced strategies for DIVA

Difficult IV access requires a toolbox of techniques and technologies. Effective strategies include:

  • Ultrasound-guided peripheral IV (USGPIV): Use high-frequency linear probes to locate suitable veins that are not visible or palpable. US guidance increases first-stick success in obese patients, those with chronic IV drug use, and oncology patients. Training and competence validation are needed before independent practice.
  • Vein illumination and transillumination devices: These non-invasive devices can be useful in pediatric and dark-skinned patients.
  • Warm compresses/immersion in warm water: Local warming dilates veins and improves chances of success.
  • Use of small-gauge catheters with stabilizing devices to minimize movement and phlebitis risk in fragile veins.
  • Alternative access: intraosseous (IO) access in emergencies, or central venous access for long-term needs.

Medications, fluid types, and drip rate considerations

Clinicians must understand the properties of IV fluids and medications because mismatches in fluid type, concentration, or rate can produce systemic harm.

Basic fluid categories

  • Isotonic (e.g., normal saline 0.9% NaCl): Remains primarily within the vascular space. Useful for volume resuscitation. Normal saline is isotonic and approximately physiologic in its osmolar effects.
  • Hypertonic: Higher osmolarity than plasma; pulls water into the vascular compartment—useful for cerebral edema or severe hyponatremia under close supervision. Risk: volume overload, especially in patients with heart failure.
  • Hypotonic: Lower osmolarity than plasma; shifts fluid into cells and the interstitial space—useful for dehydration with hypernatremia, but can cause cellular swelling and is dangerous in patients with potential increased intracranial pressure.

Drip rates and rapid infusion risks

Rapid infusion in fragile or compromised patients can precipitate cardiovascular overload and respiratory compromise. Signs consistent with fluid overload and decompensation include increased heart rate, elevated blood pressure, shortness of breath, crackles on auscultation, and decreased oxygen saturation (low O2). In extreme cases, rapid volume administration can precipitate pulmonary edema, arrhythmia, or a code blue situation. Always verify orders, ensure appropriate IV access for the prescribed rate, and monitor vulnerable patients closely.

Medication safety

Always read labels. Confusing similar syringes or bags (saline vs atropine vs lidocaine) is a preventable error. When administering IV medications, be mindful of compatibility, infusion rate, dilution, and whether the drug is a vesicant or can cause tissue necrosis if extravasation occurs (e.g., vasopressors, chemotherapy agents).

When drawing blood from a line after infusing a medication, ensure that you have flushed with an appropriate volume and waited the recommended time for that agent to clear the lumen to avoid contamination of specimens. Institutional policies or medication package inserts often provide guidance for dwell times and acceptable sample strategies.

Recognizing and managing complications

Complication awareness is essential for early intervention:

Complication Signs Immediate management
Infiltration Swelling, coolness, blanching, pain at site; decreased or no blood return Stop infusion, remove catheter, elevate limb, apply warm compress if non-vesicant; document and restart elsewhere
Extravasation Pain, burning, swelling, blistering; occurs with vesicant drugs Stop infusion, aspirate residual drug if possible, notify prescriber, follow extravasation protocol including antidotes and plastic surgery consult when necessary
Phlebitis Redness, warmth, tenderness along the vein Remove catheter, apply warm compresses, rotate sites for future access
Air embolism Sudden respiratory distress, hypotension, chest pain Clamp line, place patient in left lateral decubitus and Trendelenburg if tolerated, provide oxygen, call for emergency assistance
Catheter-related bloodstream infection (CRBSI) Fever, chills, erythema at insertion site, unexplained hypotension Remove catheter if indicated, obtain blood cultures per protocol, start antibiotics per prescriber

Clinical note: If you encounter resistance while flushing a recently placed catheter, suspect malposition (e.g., extravascular placement). Never force a flush. Document the event and contact the provider for further orders.

Special populations: pediatric, geriatric, oncology, and diabetic patients

Each population demands tailored strategies.

Geriatric patients

Older adults present unique vascular challenges: fragile, thin skin, decreased subcutaneous tissue, and tortuous veins. Use smaller-gauge catheters when feasible, prepare the skin carefully, and secure devices with gentleness to avoid skin tears. The National Institute on Aging (NIA) and resources from the National Center for Aging and Development (NCAD) emphasize person-centered approaches in geriatric care, including communication strategies, fall-risk assessments, and de-prescribing. When teaching older adults about their IV therapy or monitoring, take into account sensory deficits and mobility limitations. For further geriatric guidance see the NIA website.

(NIA link: National Institute on Aging (NIA))

Pediatric patients

Pediatric veins are smaller, and procedural anxiety is high. Use age-appropriate distraction, local anesthetic options (topical lidocaine-prilocaine creams), and devices such as transillumination. A dedicated pediatric vascular access team or experienced pediatric staff should place difficult catheters.

Oncology patients

Cancer patients often have DIVA due to chemotherapy exposure, repeated access, and fragile veins. Chemotherapy agents may be vesicants—extravasation can cause progressive tissue necrosis. Consider midline or central catheter placement for long-term chemo. When peripheral access is used, follow oncology-specific extravasation protocols and monitor closely.

Diabetics and limb selection

Avoid lower extremity IVs in diabetic patients unless absolutely necessary because peripheral vascular disease and neuropathy increase infection risk. Diabetic neuropathy may also reduce local symptom reporting (e.g., pain) in the presence of infiltration or infection. Prefer forearm or antecubital veins when possible.

Documentation, legal considerations, and professional responsibilities

Charting is not optional; it is both a patient-safety tool and legal protection. Document the time of insertion, catheter gauge and length, site location, number of attempts, patient response, and any immediate complications. Also document the label on the dressing and the authorization provided (e.g., order number or prescriber name).

Understand your scope of practice. Medical assistants and phlebotomy students must consult their supervisor if the situation exceeds their training. Always admit when you lack knowledge rather than attempting a technique beyond your training—this is professional responsibility and protects patients and practitioners alike.

Training, education, and the role of instructors

Teaching IV skills demands more than demonstration—it requires preparation, passion, and patience. Instructors should:

  • Provide clear stepwise instruction combined with supervised hands-on practice;
  • Emphasize safety: sterile technique (chlorhexidine 1-minute scrub), correct angles (15–28 degrees), bevel-up insertion, and verification of flashback;
  • Teach situational judgement: when to escalate to ultrasound-guided access, when to stop attempts, and when to call vascular access or the ordering provider;
  • Manage classroom dynamics by grouping students by skill level, using simulation, and ensuring immediate constructive feedback;
  • Model continuous learning—encourage trainees to consult evidence-based resources and institutional policies, and to pursue certification opportunities (e.g., vascular access certification programs).

Instructor tips for assessment and remediation:

  • Use validated checklists for competency evaluation;
  • Provide deliberate practice opportunities with task trainers and ultrasound phantoms;
  • Incorporate interprofessional education so student nurses, anesthesia techs, veterinary techs, and dentists understand each other’s roles and limitations;
  • Teach documentation practices as part of technical competency to instill the habit of legally defensible record-keeping.

Integrating Erikson’s psychosocial stages into IV teaching and patient education

Erik Erikson’s eight stages of psychosocial development are a valuable framework for tailoring communication and education to patients and learners of different ages and psychosocial needs. Below is a practical mapping of Erikson’s stages to IV-related teaching strategies for clinicians and instructors:

Erikson Stage Age Group Teaching/Communication Strategy
Trust vs. Mistrust Infancy Establish trust with caregivers; use soothing touch, brief explanations, and involve parents in comforting behaviors during IV placement.
Autonomy vs. Shame Toddler/Preschool Offer choices (e.g., which arm), simple explanations, and distraction techniques to support autonomy and reduce shame associated with distress.
Initiative vs. Guilt Early school-age Offer a simple role (e.g., hold bandage), explain procedures, and praise cooperation to encourage initiative.
Industry vs. Inferiority Late school-age Provide age-appropriate explanations, foster competence (e.g., teach child how to hold still), and validate feelings.
Identity vs. Role Confusion Adolescence Respect privacy, explain rationale for procedures in frank terms, and involve adolescents in decision-making about their care.
Intimacy vs. Isolation Young adulthood Address concerns about body image, encourage shared decision-making, and respect autonomy and confidentiality.
Generativity vs. Stagnation Middle adulthood Discuss roles at work/home, consider scheduling to avoid disruption, and engage patients in long-term care planning.
Integrity vs. Despair Older adulthood Use respectful communication, provide clear explanations and reassurance, consider sensory deficits, and allow time for questions. Tie into geriatric resources from NCAD and NIA.

Using Erikson’s stages helps tailor education: for a frail older adult (Integrity vs. Despair), slow, respectful teaching that acknowledges life experience increases cooperation and reduces anxiety. For student nurses and learners, using psychosocial approaches in simulation improves communication skills and patient-centered care.

Interprofessional practice: working with anesthesia, dental, and veterinary teams

Each clinical discipline brings distinct needs and considerations for IV access:

  • Anesthesia techs: often manage IV access in the perioperative period where rapid induction requires reliable access. Communicate intended induction rates and agents (e.g., propofol) to select appropriate gauge and site. Anticipate the need for larger bore access for emergent resuscitation.
  • Dentists: in-office sedation and certain dental surgeries occasionally require IV access for sedative or vasoconstrictor administration. Ensure that office protocols, emergency equipment, and training are in place to manage airway and vascular complications.
  • Veterinary techs: animals present unique anatomic and behavioral challenges. Techniques such as restraint, sedation, and use of specialized veterinary cannulas are standard. Many general access principles (asepsis, gentle securement, and documentation) still apply.

Regardless of setting, student nurses, nurses, anesthesia techs, veterinary techs, and dentists must follow institutional policies, understand medication properties (always read labels), and know when to seek assistance or escalate care.

Troubleshooting checklist for failed attempts

When an insertion fails or the catheter malfunctions, follow a systematic troubleshooting approach:

  • Stop attempting after facility-defined number of attempts to reduce patient harm—this number varies by institution but often ranges from 2–3 attempts by a single operator before escalation;
  • Reassess patient factors (dehydration, vasoconstriction, anxiety) and consider warm compresses or fluids to enhance vein prominence;
  • Consider ultrasound-guided access or consultation with a vascular access team;
  • For an already placed catheter with poor flow or resistance on flush: do not force; check for kinks, reposition the arm, check clamp positions, and aspirate gently; if unresolved, remove and re-site;
  • Document attempts, reasoning, and escalation pathway.

Policies and resources: where to look for evidence-based practice

Clinicians and instructors should consult authoritative guidance and institutional policies for the most current evidence-based practices. Useful resources include:

Practical protocols — sample insertion checklist for pre-procedure and post-procedure

The following checklist can be adapted by clinical educators and institutional committees to standardize practice. It is a sample and not a replacement for institutional policy.

Step Action
Order verification Confirm physician authorization for IV therapy, indication, solution, and rate.
Patient identification Verify identity, allergies, and relevant history (e.g., prior DVTs, dialysis access, mastectomy).
Equipment check Gather catheter of appropriate gauge, gloves, chlorhexidine prep, sterile dressing, saline flush, securement device, and label.
Site preparation Apply tourniquet (not on arms with existing IVs), warm compress if needed, choose vein tracing at least 1 inch, prep skin with chlorhexidine for 1 minute, allow to dry.
Insertion Bevel up, insert at 15–28 degrees, watch for flashback, lower angle and advance catheter, secure, tape and label.
Initial flush and verification Flush gently with saline; no resistance; check for pain, swelling, erythema. If resistance is present, stop and reassess.
Documentation Record time, gauge, site, number of attempts, patient tolerance, dressing label, and any complications.

Teaching and continuous professional development

Clinical competence in vascular access is achieved through deliberate practice, supervision, and reflective learning. Instructors should integrate simulation, evidence review, and competency checklists. Encourage learners to use resources such as institution-specific vascular access policies, the CDC for infection prevention, and specialized training organizations like PCT Institute of Healthcare and Phlebotomy Career Training for foundational skills and certification opportunities.

Putting it together: a practical scenario and stepwise decision-making

Scenario: A 78-year-old patient with congestive heart failure and chronic kidney disease requires IV access for diuretic therapy and blood draws. Veins are fragile and not readily visible.

Decision-making:

  • Assess the need for peripheral vs central access (short-term diuresis can usually be managed via peripheral access, but dialysis patients or those requiring multiple blood draws may need alternative strategies).
  • Choose a forearm vein if available; avoid lower extremities given diabetes or PVD risk; avoid dorsal hand if possible due to fragility.
  • Use warm compress and vein palpation; if veins remain non-palpable, consider ultrasound-guided peripheral IV or consult vascular access team.
  • Select a smaller gauge (e.g., 22G) for fragile veins, and position the limb to prevent kinking. Use securement devices to minimize movement.
  • Document thoroughly and monitor the patient for signs of fluid overload given heart failure—watch for increasing respiratory rate, hypoxemia (low O2), rising blood pressure and heart rate.

Quality improvement and institutional systems

Reducing DIVA-related complications is an institutional priority. Consider implementing:

  • Vascular access teams for complex cases;
  • Mandatory competency and re-certification for IV insertion and ultrasound-guided techniques;
  • Standardized documentation templates that capture number of attempts, catheter gauge, and site;
  • Audit and feedback cycles to monitor insertion success rates and complication incidence;
  • Easy access to evidence-based resources (links to CDC, NIH, NLM, and geriatric resources such as NIA).

Final practical reminders for every clinician

  • IV therapy must have physician authorization and follow facility policy;
  • Use chlorhexidine skin prep and allow a one-minute dry time for best antiseptic effect;
  • Trace veins for at least an inch and avoid hands/legs when possible—especially in diabetics;
  • Insert with bevel up at 15–28 degrees and watch for flashback; do not push too hard or you may perforate the posterior wall;
  • Resistance on flush indicates the catheter is not intravascular—stop and reassess;
  • Always read labels carefully (saline vs atropine vs lidocaine) and be mindful of solution tonicity and drug vesicant properties;
  • Do not apply tourniquets to arms with existing IV lines;
  • Document time, gauge, location, patient response, and any complications as legal protection and patient-safety practice;
  • Admit knowledge limitations and seek assistance when needed—scope-of-practice boundaries protect patients and clinicians.

For clinicians seeking formal training in phlebotomy and IV insertion skills, consider the educational offerings available through specialized training organizations such as PCT Institute of Healthcare and Phlebotomy Career Training. These programs can complement institutional training programs and help prepare student nurses and allied personnel for clinical practice.

Additional evidence-based resources and infection prevention guidance can be found at the CDC, research and clinical guidance via the NIH, literature through the NLM, and geriatric care resources via the NIA. For phlebotomy program accreditation and training standards, consult organizations such as NAPTP and testing guidance via relevant national testing agencies like NTA.

References and further reading

  • Institutional IV therapy policies and vascular access team protocols.
  • CDC guideline for the prevention of intravascular catheter-related infections (CDC).
  • National Institute on Aging resources for geriatric patient-centered care (NIA).
  • Selected training organizations: PCT Institute of Healthcare, Phlebotomy Career Training.

Ready to Earn Your National IV Certification?

The National IV Association (NIVA) offers nationally recognized certification programs for nurses, EMTs, paramedics, and other licensed healthcare professionals. Train online, test when ready, and earn credentials that employers trust.

For foundational training in healthcare careers, visit the PCT Institute of Healthcare or explore certification options at Phlebotomy Career Training.

Enroll Now →

Categories
Uncategorized

Central Venous Catheters vs. Peripheral IV Lines: What Every IV Tech Needs to Know

Central Venous Catheters vs. Peripheral IV Lines: What Every IV Tech Needs to Know

By Nancy Kimmel, MSN, FNP, RN, PhD CHMM, MSN-FNP-BC — an evidence-informed primer for student nurses, nurses, anesthesia techs, veterinary techs, and dentists who place, care for, teach about, or rely on intravascular access. This comprehensive article synthesizes clinical practice, anatomy, physiology, infection prevention, medication safety, and educational strategies so IV technicians and allied professionals can make safe, knowledgeable decisions at the bedside and in the classroom.

Why this matters to you

IV therapy is not “just a stick.” Fluids and medications administered intravascularly circulate systemically within minutes. That speed is a therapeutic advantage and a hazard: an insertion error, medication incompatibility, or breach in sterile technique can rapidly cause systemic infection, tissue necrosis, cardiopulmonary decompensation, or air embolism. That is why student nurses, nurses, anesthesia techs, veterinary techs, and dentists must understand the distinctions between peripheral IV lines and central venous catheters (CVCs), their indications, insertion principles, maintenance, and complication recognition.

Scope and common indications for IV therapy

IV therapy includes blood collection and infusions for:

  • Fluid resuscitation and maintenance (0.9% NaCl, balanced crystalloids)
  • Medication administration: antibiotics, analgesics, antiemetics, vasoactive drugs, atropine, lidocaine, and others
  • Chemotherapy and other vesicants
  • Immunosuppressants and biologics
  • Vitamin therapy and parenteral nutrition

All IV accesses and infusions require physician authorization per institutional policy. For clinicians who insert and manage access, documenting indication, consent, and orders is essential for safety and medicolegal protection.

Anatomy and layers traversed on cannulation

Understanding the tissues a needle crosses improves technique and complication recognition. On peripheral cannulation, the needle crosses:

  • Epidermis — outer keratinized layer; puncture causes initial pain and transient bleeding.
  • Dermis — vascular and innervated connective tissue; contains capillary plexuses.
  • Hypodermis (subcutaneous tissue) — adipose and loose connective tissue; depth varies by patient habitus and age, affecting angle of entry.
  • Venous tunica — the vein wall including tunica intima, tunica media, and tunica adventitia; the successful flashback indicates lumen entry.

Peripheral IV lines (PIVs): essentials

Definition and types

PIVs are short (typically 3/4 to 1.25 inches for adults), peripheral catheters inserted into superficial veins of the upper extremity. Midline catheters and peripherally inserted central catheters (PICCs) may be placed peripherally but behave differently; midlines end in the upper arm and are not central, while PICCs are threaded to a central location and are therefore CVCs.

Common insertion sites and vein selection

Prefer proximal upper extremity veins for diagnostic blood draws and short-term access. Important venues:

  • Antecubital fossa veins: cephalic, basilic, and median cubital — these are robust and allow easier cannulation and successful blood return.
  • Forearm veins: good for longer dwell times; stabilize catheter with securement devices and appropriate dressing.
  • Avoid hand and foot veins unless absolutely necessary — they are smaller, more painful, and have higher rates of dislodgement and phlebitis. Teams should especially avoid lower extremity access in diabetics due to peripheral vascular disease and infection risk.

When palpating a vein, “trace” it for an inch to ensure adequate length for catheter seating and to reduce chance of advance-through (through-and-through puncture).

Insertion technique (peripheral)

  • Angle: 15–28 degrees with the bevel up to enter skin and vein smoothly; decrease angle after flashback to seat the catheter and advance.
  • Watch for flashback: a brisk, free-flowing blood flash in the catheter hub indicates lumen entry. After flashback, advance catheter slightly and then advance catheter over the needle (if using over-the-needle catheter) while maintaining stabilization.
  • Do not push too hard; forcing the needle risks puncturing the posterior wall and causing extravasation or hematoma.
  • After placement, secure catheter, apply appropriate sterile dressing, and flush gently. Resistance during flush indicates the catheter is not intravascular — stop, evaluate, and do not infuse under pressure.

Dwell times and maintenance

PIVs are intended for short-term use — most institutions recommend removal or reassessment at 72–96 hours unless clinically indicated for longer use. Regular site assessments for redness, swelling, pain, and securement integrity are required.

Central Venous Catheters (CVCs): essentials

Types of central venous access

Type Where it terminates Common indications
Non-tunneled CVC Superior vena cava (SVC) Emergency access, vasopressors, central venous pressure monitoring
Tunneled CVC (e.g., Hickman) SVC Long-term chemotherapy, TPN, repeated access
Implanted port SVC via port reservoir Intermittent chemotherapy, long-term access with low infection risk
PICC (Peripherally Inserted Central Catheter) SVC (via basilic/cephalic vein) Prolonged IV antibiotics, TPN, chemotherapy

Indications for central access vs. peripheral

  • Need for high-osmolarity solutions (TPN), vesicant chemotherapy, or long-term antibiotics
  • Central venous pressure monitoring or rapid large-volume resuscitation
  • Poor peripheral venous access (multiple failed attempts)
  • Frequent blood sampling that would cause repeated peripheral sticks

Insertion principles (central)

CVC insertion — whether non-tunneled, tunneled, PICC, or port — is a higher-risk procedure. It requires imaging verification of tip position and often uses ultrasound guidance to reduce mechanical complications such as pneumothorax and arterial puncture. Key safety steps:

  • Maximum sterile barrier precautions: cap, mask, sterile gown, sterile gloves, large sterile drape.
  • Skin antisepsis: chlorhexidine with adequate contact time — scrub for at least 30 seconds and allow drying; many protocols emphasize a minimum of 1 minute of chlorhexidine skin contact for thorough antisepsis prior to insertion and dressing changes.
  • Ultrasound guidance during vessel puncture to visualize needle entry and avoid adjacent structures.
  • Radiographic confirmation of tip location before infusion of incompatible agents; immediate post-procedure chest x-ray to rule out pneumothorax when indicated.

Comparative overview: CVC vs PIV

Feature Peripheral IV Central Venous Catheter
Dwell time Short-term (days) Days to months/years (depends on type)
Insertion complexity Low — bedside, quick High — requires sterile barrier, imaging, trained providers
Permitted infusions Most isotonic meds; avoid vesicants/hyperosmolar solutions Vesicants, hyperosmolar solutions, multiple concurrent infusions
Infection risk Lower but still significant Higher risk of CLABSI; prevention bundles critical
Complications Infiltration, phlebitis, extravasation Pneumothorax, CLABSI, catheter thrombosis, air embolus

Sterile technique and infection prevention

The science behind central line-associated bloodstream infections (CLABSIs) shows that consistent application of evidence-based insertion and maintenance bundles reduces infections. Key elements every IV tech must know:

  • Chlorhexidine skin prep — scrub thoroughly; institutional policies commonly require at least a 30-second scrub with a 1-minute full contact time for maximal antisepsis.
  • Maximal sterile barrier precautions for CVC insertion.
  • Proper dressing and securement: transparent semipermeable dressings or gauze per policy; dressing changes per institutional timeframe or when soiled or loose.
  • Daily assessment of line necessity: remove any line no longer needed to reduce exposure time.
  • Use of alcohol/chlorhexidine caps and appropriate hub disinfection (“scrub the hub” for 15 seconds) prior to access.

For evidence-based guidance visit the CDC central line recommendations: CDC — Bloodstream Infection Guidelines.

Drip rates, fluid types, and physiologic consequences

Fluids are not inert carriers; their tonicity and volume kinetics have physiologic effects that must be matched to patient condition.

Crystalloid categories

Solution Tonicity and effect Clinical pearls
Normal saline (0.9% NaCl) Isotonic; approximates plasma osmolarity. Normal physiologic pH is 7.35–7.45; NS is effectively isotonic though can produce hyperchloremic metabolic acidosis if large volumes given. Safe for initial resuscitation; verify compatibility with meds and patient acid-base status.
Hypertonic saline Hypertonic — pulls fluid into the vascular space from cells and interstitium. Used for cerebral edema or severe hyponatremia correction under controlled conditions; risky in heart failure due to volume overload.
Hypotonic solutions (e.g., 0.45% NaCl) Hypotonic — shifts fluid from vascular space into interstitium and cells. Used for true water deficit; dangerous in patients at risk for cerebral edema or hypovolemia.

Rapid infusion risks

Rapid infusion in fragile patients (elderly, cardiac disease) can precipitate acute decompensation — tachycardia, hypertension, dyspnea, hypoxemia — and progress to pulmonary edema or require emergent resuscitation (code blue scenarios). Monitor vital signs and oxygenation during boluses; use controlled infusion pumps when available.

Medication administration, labeling, and safety

Medication errors during IV therapy are among the most dangerous. Every IV tech must:

  • Always read labels carefully — distinguish saline from atropine, lidocaine, or other look-alike containers. Never assume fluid identity based on bag color or shape.
  • Follow “Five Rights”: right patient, right medication, right dose, right route, right time.
  • Be aware of compatible diluents and maximum concentrations for peripheral vs central administration — some meds are vesicants and require central access.
  • Use appropriately sized syringes for flushing: generally, 10 mL syringes minimize excessive pressure on small-bore catheters that can damage them; smaller syringes can generate dangerously high pressures.
  • Know catheter-specific locking solutions (e.g., heparin lock) and institutional protocols for flushing and locking volumes.

Blood draws and medication timing

A critical practical point: when a line has been used for medication dosing, especially antibiotics or vasoactive drugs, wait an appropriate interval and flush the line thoroughly before drawing blood samples from that lumen to avoid sample contamination and spurious lab values. If sampling for therapeutic drug monitoring, follow institution-specific dwell/flush intervals to avoid erroneous results.

Tourniquet use and lines

Do not apply tourniquets proximal to or over an arm that has an IV line in place. Doing so can increase infusion pressure, risk infiltration, and cause local complications. If venous stasis is required for blood draws, use an alternate limb or follow institutional protocols that may include temporarily pausing infusions and disinfecting the hub prior to sampling.

Complications and what to look for

Peripheral line complications

  • Phlebitis: pain, erythema, warmth along vein — remove catheter if suspected and document.
  • Infiltration/extravasation: swelling, coolness, lack of blood return — stop infusion immediately; vesicant extravasation requires specialized management.
  • Hematoma: occurs with vessel puncture; apply pressure and monitor.

Central line complications

  • CLABSI: fever, chills, positive blood cultures — follow infection control protocols and reporting requirements.
  • Catheter-related thrombosis: swelling of the limb or face, catheter malfunction — manage with imaging and anticoagulation as indicated.
  • Mechanical complications: pneumothorax (decreased breath sounds, hypoxia), arterial puncture (pulsatile blood), air embolus (sudden respiratory distress, chest pain) — emergent response required.

Recognizing an air embolus

Air embolism is preventable with proper technique (clamps, occlusive dressings, patient positioning). Signs include sudden chest pain, dyspnea, hypotension, hypoxia, and neurologic changes. If suspected, lay the patient on left lateral decubitus and trendelenburg, administer high-flow oxygen, and call the emergency response team.

Troubleshooting cannulation and infusion problems

  • No flashback: reposition the angle slightly or withdraw and reattempt at a new site; do not blindly advance.
  • Flashback then resistance: if resistance occurs on flush, do not force fluids; check for kinks, securements, and reposition. If still resistant, consider catheter malposition or extravasation.
  • Blood return absent but infusion flows: evaluate for partial catheter occlusion; perform aspiration attempts per protocol and consult supervisor for management and possible imaging.

Documentation and professional responsibilities

Accurate charting is not optional — it is a legal and patient-safety imperative. Document the following each time you insert, assess, or remove an IV:

  • Time and date of insertion/removal
  • Gauge and length of catheter
  • Exact location (e.g., right forearm, cephalic vein, 10 cm proximal to wrist)
  • Number of attempts and who performed the procedure
  • Patient response, pain score, and complications (hematoma, bleeding, unusual findings)
  • Dressing type and securement used
  • Flush volumes and solutions used (e.g., 10 mL 0.9% NaCl), including any heparin locks

Good documentation protects patients and caregivers alike.

Scope of practice and when to escalate

Know your scope. Medical assistants (MAs), student nurses, and novice techs must consult supervisors for procedures outside their defined scope. If you don’t know an answer, the correct professional action is to stop, ask for help, and document the consultation. Admitting knowledge limits is professional practice and patient safety advocacy.

Special populations: geriatrics and the frail

Older adults present unique challenges: fragile skin, thin subcutaneous tissue, tortuous and fragile veins, comorbid cardiopulmonary disease, and altered fluid distribution. Applying geriatric-informed practice reduces harm.

Practical geriatric adjustments

  • Use smaller gauge catheters when clinically appropriate to reduce vessel trauma.
  • Stabilize fragile skin with gentle adhesives and protective dressings; consider transparent dressings that minimize tape trauma on changes.
  • Anticipate decreased venous reserve — choose proximal veins with good support and use ultrasound guidance when available.
  • Adjust infusion rates conservatively; monitor for signs of fluid overload.

For evidence and resources on aging and geriatric care, consult the National Institute on Aging: NIA and the National Center for Aging and Development (NCAD) for applied geriatric training material.

Teaching patients and learners: integrating Erikson’s psychosocial stages

As an instructor and clinician, I integrate Erikson’s eight stages of psychosocial development into patient and student education. Consider developmental stage when communicating:

  • Trust vs. mistrust (infants): caregivers need simple explanations and reassurance.
  • Autonomy vs. shame (toddlers): provide choices (e.g., “Which arm would you prefer?”) to enhance control.
  • Initiative vs. guilt (preschoolers): use play to explain procedures.
  • Industry vs. inferiority (school-age): explain steps, allow practice with dolls or simulation kits.
  • Identity vs. role confusion (adolescents): address privacy and autonomy; include them in decision-making.
  • Intimacy vs. isolation (young adults): respect independence and encourage informed consent.
  • Generativity vs. stagnation (adults): relate procedures to roles (work, family) and functional outcomes.
  • Integrity vs. despair (older adults): acknowledge life experience, offer dignified explanations, and address fears about loss of autonomy.

For student nurses and educators, teaching techniques that recognize psychosocial context improve consent, cooperation, adherence, and learning retention.

Instructional strategies for IV educators: preparation, passion, patience

Teaching IV skills requires more than technical demonstration. Instructors should embody the following principles:

  • Preparation — have equipment, models, and learning objectives prepped; review institutional policies, infection prevention bundles, and emergency responses (air embolus, extravasation). Include links to reputable resources such as the PCT Institute of Healthcare and Phlebotomy Career Training for supplemental curricula and simulation tools.
  • Passion — modeling professional, evidence-driven enthusiasm motivates student nurses, MAs, and allied techs (anesthesia techs, veterinary techs, and dentists) to adopt best practices.
  • Patience — learners acquire psychomotor skills at different paces. Use deliberate practice, feedback, and competency checklists. Encourage reflection on each attempt.
  • Manage classroom dynamics — set ground rules for patient simulation, ensure psychological safety, and provide tiered challenges from PIV to PICC/central line care.
  • Continuous learning — incorporate current guidelines (CDC, NIH, NLM) into curricula and require learners to demonstrate competence in sterile technique, hub disinfection, and complication recognition.

Teaching tips tied to clinical realities

  • Demonstrate scrub times with visible timers for chlorhexidine prep (simulate the 1-minute contact time).
  • Use ultrasound-guided simulation to teach sono-anatomy for vessels and adjacent structures.
  • Simulate complication scenarios (air embolus, CLABSI, extravasation) and run debriefs to reinforce early recognition and escalation.
  • Emphasize ethical practice: informed consent, documentation, and interprofessional communication — critical for student nurses, nurses, anesthesia techs, veterinary techs, and dentists alike.

Geriatric teaching — resources and integration

When instructing about IV care in older adults, incorporate resources from the National Center for Aging and Development and the National Institute on Aging to frame age-specific physiologic and psychosocial considerations. Consider using case studies of older patients with multimorbidity, and align techniques with goals of care and patient preferences.

Regulatory, professional, and credentialing resources

Continual professional development and adherence to credentialing standards are essential. Useful organizations and resources include:

Clinical pearls every IV tech should memorize

  • 15–28° angle, bevel up for peripheral insertion; reduce angle after flashback.
  • Do not force flush against resistance — catheter may be extravascular or occluded.
  • Chlorhexidine skin prep with appropriate contact/dry time; treat it as non-negotiable.
  • Isotonic 0.9% NaCl matches physiologic pH range (7.35–7.45) and is the most common crystalloid used for flushes and resuscitation.
  • Hypertonic solutions pull fluid into the vascular compartment — useful but dangerous in CHF patients.
  • Hypotonic solutions push fluid into tissues — avoid with risk of cerebral edema.
  • Always read labels — differentiate saline from lidocaine, atropine, or other agents.
  • Document time, gauge, location, number of attempts, patient response — this is legal protection.
  • Do not tourniquet over an arm with an IV; choose alternate limb or follow facility protocols.
  • Student nurses, nurses, anesthesia techs, veterinary techs, and dentists must know when to escalate — consult supervisors when outside your scope.

Practical checklist for safe IV placement and maintenance

  • Verify physician order and indication.
  • Perform hand hygiene and gather supplies.
  • Identify patient and explain procedure appropriate to developmental stage (use Erikson-informed communication).
  • Select vein and trace at least 1 inch to ensure length; avoid hands/legs when possible, especially in diabetics.
  • Apply tourniquet distal to insertion site (not over preexisting IV), palpate vein, cleanse with chlorhexidine for required time, and allow to dry.
  • Insert at 15–28° with bevel up; watch for flashback; reduce angle and advance catheter as appropriate.
  • Secure and dress per policy; flush gently and assess for patency and absence of pain or swelling.
  • Document fully: time, gauge, location, response, dressing, flush volumes.
  • Educate patient and caregivers on signs of complications and when to call for help.

Resources for continued training and certification

For structured educational programs and simulation-based competency development, consider resources such as the PCT Institute of Healthcare and Phlebotomy Career Training. These institutions provide supplemental curricula geared to phlebotomy, peripheral access, and foundational IV skills that complement formal nursing and allied health training.

References and authoritative reading

Primary guidelines and peer-reviewed literature should be consulted for protocol development and for staying current. Start with the CDC lines for prevention bundles (CDC BSI Guidelines), the NIH library resources (NIH / NLM), and geriatric materials from the National Institute on Aging. Professional organizations like NAPTP and NTA publish standards and competence frameworks that are useful for training programs and clinical governance.

Audience-specific notes

Student nurses

Focus on fundamentals — anatomy, sterile technique, patient communication, documentation, and knowing when to call your preceptor. Practice under supervision and use checklists to achieve competency.

Nurses

You are the clinical decision-makers who balance patient needs, vascular access options, and safety. Lead CLABSI prevention, mentor student nurses, and ensure accurate charting for legal protection.

Anesthesia techs

Rapid infusions and emergent vascular access are commonplace in anesthesia. Know the physiologic effects of fluid types and watch for signs of volume overload during rapid boluses.

Veterinary techs

Principles of venous access translate to animal patients, though species-specific anatomy and behavior vary. Sterile technique, dose calculations, and careful monitoring apply in all settings.

Dentists

When IV access is used in dental sedation or emergency settings, ensure you follow institutional standards, use appropriately trained personnel, and coordinate with nurses/anesthesia techs for monitoring and emergency response.

Takeaway (clinical synthesis)

Peripheral IVs and central venous catheters are complementary tools. PIVs are suitable for short-term, low-osmolarity infusions and routine blood draws. CVCs are reserved for high-risk infusions, hemodynamic monitoring, and long-term therapy. Sterile technique, chlorhexidine skin prep (with adequate contact time), correct vein selection, careful insertion technique (15–28° bevel up), and vigilant monitoring for complications are common denominators for safe practice. Documentation, scope-of-practice awareness, and continuous education — guided by principles from the CDC, NIH, NLM, and geriatric resources such as the NIA and NCAD — complete the framework for professional, safe IV therapy.

For further structured learning, explore the PCT Institute of Healthcare and Phlebotomy Career Training links embedded above, and consult regulatory and evidence-based resources from the CDC, NIH, NLM, NIA, NAPTP, and NTA to keep practice current and patient-centered.

Ready to Earn Your National IV Certification?

The National IV Association (NIVA) offers nationally recognized certification programs for nurses, EMTs, paramedics, and other licensed healthcare professionals. Train online, test when ready, and earn credentials that employers trust.

For foundational training in healthcare careers, visit the PCT Institute of Healthcare or explore certification options at Phlebotomy Career Training.

Enroll Now →

Categories
Uncategorized

Blood Transfusions and IV Therapy: Protocols, Safety, and Transfusion Reactions

Intravenous (IV) therapy and blood transfusion are cornerstone interventions across acute care, ambulatory care, perioperative settings, oncology clinics, veterinary practices, and dental surgeries. Whether you’re preparing for the National IV Exam or expanding your clinical knowledge, this guide provides a detailed, evidence-informed reference covering IV insertion, vascular access, infusion therapy, blood transfusion procedures, sterile technique, infusion physiology, transfusion reactions, documentation, and patient-centered teaching strategies. As a clinician-educator, I write specifically for student nurses, nurses, anesthesia techs, veterinary techs, dentists, and phlebotomy students to support safe IV practice and professional development.

In this guide, you’ll learn:

  • When IV therapy and blood transfusions are indicated
  • How to select veins, catheter gauges, and IV fluids for different clinical situations
  • Best practices for peripheral IV insertion, sterile technique, and medication safety
  • How to recognize and respond to transfusion reactions and infusion-related complications
  • Proper documentation, patient monitoring, and blood collection techniques
  • Scope-of-practice responsibilities and patient safety best practices

When is IV Therapy and Blood Collection Needed?

IV infusion, blood bag, and syringe preparation

IV therapy is not limited to fluid rehydration. Common clinical indications include:

  • Intravenous fluid replacement and electrolyte correction, including isotonic (e.g., normal saline), hypotonic, and hypertonic solutions.
  • Blood and blood component transfusion (packed red blood cells, platelets, plasma, cryoprecipitate).
  • Medication delivery—antibiotics, chemotherapeutic agents, immunosuppressants, analgesics, vasoactive infusions, and emergency drugs (e.g., atropine, epinephrine).
  • Chemotherapy and biologic therapies that require controlled infusion rates and central venous access in some cases.
  • Vitamin therapy and parenteral nutrition when enteral routes are inadequate.
  • Phlebotomy for diagnostic testing and therapeutic blood collection.

Critical point: IV therapy and blood product administration require physician (or authorized prescriber) authorization. Before performing IV therapy independently, all personnel—including student nurses, nurses, anesthesia techs, veterinary techs, and dentists—should understand their scope of practice, facility policies, and professional responsibilities. For more information, see the NIVA Code of Ethics and Scope of Practice.

Vascular Anatomy for Safe IV Insertion

When inserting an IV catheter you pass through multiple tissue layers before entering the lumen of a vein. From superficial to deep:
  • Epidermis — skin barrier; primary site for antisepsis.
  • Dermis — contains sensory nerves and capillary plexuses; potential for pain and bleeding.
  • Hypodermis/Subcutaneous tissue — fatty layer; provides mobility but can obscure veins.
  • Venous wall (tunica) — internal endothelial lining is fragile and must be handled with aseptic technique to prevent thrombosis and phlebitis.

Sterile Technique for Safe IV Insertion

IV therapy carries systemic risks because infused fluids and medications bypass cutaneous defenses and rapidly enter the circulation. Errors can cause systemic infections, extravasation leading to tissue necrosis, and even air embolism. Therefore:

  • Use strict aseptic technique for catheter insertion and blood product handling. (Proper sterile technique is one of the most effective ways to reduce catheter-related infections and other IV complications.)
  • Prepare the skin using chlorhexidine when available. A full 30-second to 1-minute friction scrub is recommended by many protocols for central and peripheral access sites—ensure the one-minute cleanse for optimal antisepsis when indicated.
  • Don appropriate personal protective equipment and use sterile gloves for catheter insertion per facility policy.
  • Label IV lines and tubing immediately after setup. Confirm medication names and concentrations by reading the labels aloud with a second clinician when available.

How to Choose the Best Vein for IV Insertion

Diagram of arm veins for IV insertion

The antecubital fossa remains the most accessible site for many phlebotomies and peripheral IVs. The primary superficial veins are the cephalic, basilic, and median cubital veins.

Key practical tips:

  • Trace the vein for at least one inch (2–3 cm) proximally and distally to ensure straight, patent vein length for catheter advancement.
  • Avoid hand veins and lower extremity veins unless clinically necessary—this is especially important in patients with diabetes mellitus where perfusion and healing can be compromised.
  • Consider the patient’s comfort and mobility; avoid placing IVs over joints when possible.

How to Insert a Peripheral IV Catheter

The mechanical steps of venipuncture are deceptively simple but require practice to master. For a complete walkthrough of the procedure, see our step-by-step guide to peripheral IV insertion.

  • Insertion angle: 15–28 degrees relative to the skin surface is the commonly accepted range for peripheral venous cannulation. For tighter, superficial veins, use the lower end of the angle range (15–20°); for deeper or more mobile veins, a slightly steeper angle up to 28° may be needed.
  • Bevel orientation: keep the bevel up to facilitate smooth entry and enable clear flashback visualization.
  • Flashback: observe a flash of blood in the catheter hub as confirmation of venous entry. Once the flashback is visualized, lower the angle slightly and advance only the catheter—not the needle—into the lumen.
  • Do not push too hard. Forceful advancement risks transfixing the vein and causing through-and-through puncture, hematoma, or infiltration.
  • Resistance on flush: if you encounter resistance when flushing the catheter, assume you are not optimally positioned in the vein or that there is a clot/occlusion. Stop and reassess—do not force the flush.

IV Catheter Gauges and Flow Rates Explained

Choosing an appropriate catheter gauge depends on the infusion needs (blood transfusion vs maintenance fluids vs viscous medications) and the patient’s vein size. The table below outlines common peripheral IV catheter sizes and typical uses.

Gauge (G) Internal Diameter & Flow Common Clinical Uses
14 G Very large, high-flow Trauma, massive transfusion, rapid fluid resuscitation
16 G High-flow Major surgery, large-volume transfusion
18 G Moderate-high flow Blood transfusion, contrast administration, many IV medications
20 G Moderate flow General IV fluids, blood draws in adults
22–24 G Small bore Pediatric patients, fragile elderly veins, slow infusions

Clinicians must balance the need for higher flow (e.g., for transfusion) against the risks of inserting large-bore catheters in fragile veins (common in elderly patients). When transfusing blood, an 18–20G peripheral IV is typically preferred for adults to minimize hemolysis and permit appropriate flow rates.

Types of IV Fluids: Isotonic, Hypotonic, and Hypertonic

Understanding the osmolarity and physiologic targets of IV fluids is essential for safe therapy. For a more detailed discussion of fluid selection and tonicity, see our guide to Types of IV Fluids: Isotonic, Hypotonic, and Hypertonic Solutions Explained.

  • Normal saline (0.9% NaCl) is isotonic. It closely matches extracellular osmolarity and is pH neutral relative to blood (blood pH 7.35–7.45). It remains within the vascular and interstitial compartments without significant osmotic shifts. Many resuscitation and blood administration protocols use normal saline as the carrier fluid.
  • Hypertonic solutions (e.g., 3% NaCl, hypertonic saline) pull water from the intracellular compartment into the vascular space and can reduce cellular edema. They are useful in specific scenarios (e.g., cerebral edema) but can precipitate volume overload and osmolar shifts—use cautiously in patients with heart failure.
  • Hypotonic solutions (e.g., 0.45% NaCl) promote movement of water into cells and interstitial space. They can treat dehydration due to hyperosmolar states but risk cellular swelling; avoid in patients at risk for increased intracranial pressure or with unstable hemodynamics.

IV Infusion Rates, Monitoring, and Patient Safety

Drip rates and infusion speed directly impact patient safety. Rapid infusion in fragile patients may precipitate cardiovascular overload and decompensation.

Key signs of infusion-related overload include:

  • Increased heart rate (tachycardia)
  • Elevated blood pressure
  • Acute shortness of breath and tachypnea
  • Decreased oxygen saturation (SpO2)
  • Jugular venous distension and pulmonary crackles on auscultation

Two critical transfusion-related overload syndromes:

  • TACO (Transfusion-Associated Circulatory Overload): due to rapid or excessive transfusion resulting in volume overload. Treat by stopping the infusion, providing oxygen, administering diuretics as indicated, and contacting the prescriber.
  • TRALI (Transfusion-Related Acute Lung Injury): immune-mediated lung injury associated with transfusion; presents with acute hypoxemia and bilateral pulmonary infiltrates. It requires immediate cessation of the transfusion and advanced respiratory support.

Clinicians should also be familiar with the early signs of IV complications, including phlebitis, infiltration, extravasation, catheter-related infections, and air embolism. Our guide to Recognizing and Managing IV Complications explores these complications in greater detail.

Common Blood Transfusion Reactions and How to Respond

Blood transfusions can provoke a spectrum of reactions. Prompt recognition and action are essential to minimize morbidity and mortality. The table below summarizes common transfusion reactions, their typical onset, and immediate management steps.

Reaction Typical Presentation Immediate Management
Acute Hemolytic Transfusion Reaction (AHTR) Fever, chills, flank pain, hemoglobinuria, hypotension, oliguria/anuria; occurs minutes to hours after transfusion begins. Stop transfusion, maintain IV line with normal saline, notify the blood bank and prescriber, obtain labs (bilirubin, hemoglobin, haptoglobin, direct antiglobulin test), and send the remaining blood and tubing to the blood bank.
Febrile Non-Hemolytic Reaction Fever and chills during or within hours of transfusion, often in patients with previous transfusions. Stop or slow the transfusion depending on severity, administer antipyretics, notify the blood bank, and consider leukoreduced products for future transfusions if reactions recur.
Allergic Reaction Urticaria, itching, flushing; severe cases may progress to bronchospasm or anaphylaxis. Stop the transfusion for anything beyond mild urticaria. Administer antihistamines for mild reactions. For anaphylaxis, give IM/IV epinephrine, provide airway support, and follow ACLS/anaphylaxis protocols.
Bacterial Contamination/Sepsis High fever, rigors, hypotension, and septic shock occurring minutes to hours after transfusion. Stop the transfusion, obtain blood cultures from the patient and blood bag, start broad-spectrum antibiotics, provide aggressive fluid resuscitation, and notify the blood bank and infection control.
TRALI Acute hypoxemia within 6 hours, bilateral pulmonary infiltrates, and no evidence of circulatory overload. Stop the transfusion, provide respiratory support (oxygen or ventilation), notify the blood bank, and provide supportive critical care.
TACO Dyspnea, hypoxemia, hypertension, and pulmonary edema, typically within 6 hours of transfusion. Stop the transfusion, sit the patient upright, administer oxygen and prescribed diuretics, monitor vital signs, and consider slower infusion rates or split units for future transfusions.
Air Embolism Sudden dyspnea, chest pain, hypotension, or neurologic changes during or immediately after IV line manipulation. Clamp the tubing, place the patient in the left lateral Trendelenburg position if possible, administer oxygen, activate the emergency response team, and ensure all IV connections remain secure to prevent recurrence.

IV Medication Safety and Label Verification

Healthcare professional administering IV fluids

Medication errors involving IV lines can have systemic consequences because the drug enters circulation directly. Always:

  • Read labels carefully—distinguish saline from medications such as atropine, lidocaine, dopamine, or chemotherapeutic agents. Verbalize the drug and dose when preparing to administer (two-person verification when required).
  • Confirm drug compatibility before adding medications to IV lines or piggybacks. Use compatibility charts and pharmacy consultation for central lines and continuous infusions.
  • Wait the appropriate dwell or clearance time before drawing blood from a line that has been used for medication infusion. Facility policies vary, but many require flushing the line with saline and waiting 2–5 minutes (or a specified volume/time) to avoid sample contamination—always follow your institution’s drawn-sample protocol.
  • Do not use tourniquets on arms with active IV lines or blood transfusions—tourniquets can alter local pressure, encourage infiltration, and compromise collection quality.

How to Draw Blood from Patients with an IV

Phlebotomy in the presence of IV infusions requires extra attention:

  • Whenever possible, draw blood from a site opposite the active IV. If the contralateral arm is not available, consider distal sites below the IV after stopping the infusion and flushing according to policy.
  • Document the time the infusion was stopped, the volume of saline flush used, and the interval before blood sampling. This detail is part of quality control and helps the laboratory interpret results.
  • For students and MAs, if you are outside your scope of practice, consult or defer to a supervisor. MAs must consult supervisory staff per facility policy before drawing from lines or altering infusions.

IV Therapy Documentation and Legal Responsibilities

Thorough charting is essential for patient safety and legal protection. Record:

  • Time and date of IV insertion or blood transfusion start and stop.
  • Gauge and type of catheter, exact insertion site (e.g., left antecubital, cephalic vein), number of attempts, and patient response to procedure.
  • Medication names, doses, infusion rates, and any flush volumes used.
  • Any adverse events, transfusion reactions, and actions taken including notifications, lab draws, and blood bank communications.

If you lack knowledge or experience to perform a task safely, admit that limitation and seek assistance. This is not only ethical but protects patients and your professional license. Student nurses, MAs, and allied personnel should always operate within their defined scope of practice and institutional policy. Learn more in the NIVA Code of Ethics and Scope of Practice.

Blood Transfusion Protocols and Laboratory Coordination

Nurse administering IV therapy to an older patient

Blood product administration requires coordinated steps between the clinical team and the blood bank:

  • Pre-transfusion checks: patient identification (two identifiers), product check (unit number, blood type, expiration), and baseline vital signs within the required window (often within 30 minutes) prior to starting transfusion.
  • Initial transfusion rate: many facilities begin transfusions at a slower rate for the first 15 minutes (e.g., 1–2 mL/kg/hr, or a specified mL/hr per protocol) while closely monitoring for reactions. If no reaction, escalate to the ordered rate.
  • Monitoring: document vitals at baseline, 15 minutes, 30 minutes, 1 hour, and at completion—or per facility policy and clinical status.
  • Post-reaction laboratory steps: if a reaction is suspected, obtain required labs (urine for hemoglobin, direct antiglobulin test, post-transfusion CBC, blood cultures) and send them to the lab per the transfusion service protocol.

Special Considerations for Geriatric Patients

Older adults present unique vascular and physiologic challenges. The National Center for Aging and Development (NCAD) and the NIA provide guidance emphasizing:

  • Fragile, tortuous veins with decreased subcutaneous tissue require smaller gauges (22–24 G) in many cases and careful stabilization of the catheter.
  • transfusion strategies and slower infusion rates may be appropriate.
  • Polypharmacy and altered pharmacokinetics alter responses to IV medications; consult medication reconciliation and pharmacy for dosing adjustments.
  • Always consider comorbidities (e.g., CHF, renal impairment) when planning fluid and transfusion therapy; involve interdisciplinary geriatrics or palliative services if appropriate.

For evidence-based guidance on caring for older adults, medication safety, and patient communication, clinicians can refer to the National Institute on Aging (NIA), which provides resources for healthcare professionals and patient education.

How to Manage Blood Transfusion Reactions

If a transfusion reaction is suspected, act immediately:

  1. Stop the transfusion immediately, but maintain IV access with normal saline using a new tubing set to preserve venous access for medications and emergency treatment.
  2. Assess the patient using the ABC approach (Airway, Breathing, Circulation) and provide oxygen or airway support as required.
  3. Notify the appropriate personnel, including the prescriber, blood bank, and transfusion service without delay.
  4. Follow facility protocols for post-reaction investigations, including collection of appropriate laboratory specimens (e.g., post-reaction CBC, DAT, repeat crossmatch, blood cultures) and return the implicated blood product and tubing to the blood bank.
  5. Document thoroughly, including:
    • Time of reaction
    • Signs and symptoms
    • Vital signs
    • Interventions performed
    • Communication with the prescriber, blood bank, and senior clinicians

Preventing IV Therapy and Blood Transfusion Complications

Preventing IV and transfusion-related complications requires a combination of standardized processes, clinical vigilance, and ongoing education.

Best practices include:

  • Standardize patient identification procedures and two-person verification for blood products and high-risk medications.
  • Use barcode scanning for patient identification and blood products whenever available.
  • Follow evidence-based line care, dressing changes, and infection prevention bundles.
  • Provide regular competency training and simulation exercises covering transfusion reactions, IV complications, and emergency response.

IV Therapy Scope of Practice and Professional Responsibilities

Healthcare team in an IV therapy training lab

Every healthcare professional has a responsibility to practice safely within their education, training, and legal scope of practice.

Student nurses should always work under appropriate supervision, while medical assistants and other allied health professionals must consult a supervisor before performing procedures outside their approved competencies.

As a healthcare professional, you should always:

  • Know your institution’s policies and your legal scope of practice.
  • Recognize your limitations and seek supervision whenever necessary.
  • Document accurately and completely, including:
    • Time of procedure
    • Catheter gauge
    • Insertion site
    • Patient response
    • Education provided
  • Participate in multidisciplinary communication and escalation pathways when infusion or transfusion complications occur.

Quality Improvement, Reporting, and Continuing Education

Maintaining competency in IV therapy and blood transfusion requires ongoing education and continuous quality improvement.

Healthcare professionals should:

  • Report adverse events according to institutional and national reporting requirements.
  • Participate in regular competency assessments and simulation training.
  • Stay current with guidance published by the CDC, NIH, NLM, and other recognised professional organisations.
  • Consider joining professional organizations such as the National Association of Phlebotomy and Transfusion Professionals (NAPTP) to support continuing education, professional development, and networking.

Practical Checklists for Bedside Clinicians and Students

Before the procedure:

  • Verify the order and clinical indication.
  • Obtain consent where required.
  • Assemble equipment and check expiration dates.
  • Perform hand hygiene and prepare the insertion site appropriately.
  • Select the correct vein and catheter gauge.

During the procedure:

  • Insert the catheter using the appropriate angle and technique.
  • Confirm flashback before advancing the catheter.
  • Secure and label all tubing and dressings.
  • Monitor the patient closely throughout the infusion or transfusion.

If a transfusion reaction occurs:

  • Stop the transfusion immediately.
  • Keep the IV line open with new saline tubing.
  • Notify the blood bank and prescriber.
  • Collect required laboratory specimens.
  • Document all findings and interventions.

Clinical Resources and Further Reading

Continue building your knowledge with evidence-based guidance and professional training from trusted organisations.

Clinical Guidance

  • CDC: Infection prevention, surveillance, and patient safety.
  • NIH: Clinical research and evidence-based healthcare resources.
  • NLM: Medical literature and research databases.
  • NIA: Older adult care, medication safety, and patient education.

Professional Education

Key Takeaways for Practitioners and Learners

Safe IV therapy and blood transfusion practice depends on a combination of technical proficiency, clinical judgement, and effective communication.

Healthcare professionals should always:

  • Follow aseptic technique and infection prevention protocols.
  • Select the appropriate catheter gauge and infusion rate.
  • Verify medications and blood products before administration.
  • Recognise and respond rapidly to transfusion reactions.
  • Document procedures thoroughly.
  • Practice within their legal scope while seeking supervision whenever necessary.
  • Prioritise patient safety, teamwork, and continuous professional development.

Continue Your IV Education

Whether you’re beginning your healthcare career, preparing for certification, or expanding your teaching credentials, ongoing education is essential to safe, evidence-based patient care.

Explore additional training and professional development through the National IV Association, or build your clinical skills with PCT Institute of Healthcare and Phlebotomy Career Training, offering certification-focused courses, hands-on education, and curriculum resources for aspiring and experienced healthcare professionals alike.